If you have a driver's license issued by your home country, it can be converted into a Japanese license by applying to the prefectural Driver's License Center. International Driving Permits cannot be converted.
Information on converting your license can be found in the JET General Information Handbook (p125), the Ishikawa Prefecture Living Guide (p43-45), and the Ishikawa Prefecture Driver's License Center website (Japanese).
Prior to June 2002, it was okay for foreigners to drive in Japan by continuously renewing their International Drivers Permits. Unfortunately now…
- You cannot simply keep on renewing your International Drivers Permit and more importantly...
- Your international driver’s license is ONLY VALID FOR A PERIOD OF 12 MONTHS AFTER YOU INITIALLY LAND IN JAPAN (regardless of what it says on your international drivers license).
This means that after being in Japan for 12 months, you will have to get a Japanese drivers license if you want to drive.
This video covers the process from start to finish from an Aichi-based American Non-JET. While it does contain information that does not apply to the process in Ishikawa, it is a pretty useful guide to give you an idea of what to expect. See the process below for an Ishikawa-specific guide.
Before You Start: Application Requirements[]
To apply, you must:
- have a valid foreign driver's license (an expired license or an IDP will not be converted)
- be able to prove that you stayed in the issuing country for at least three months in total after obtaining the license*
*Note: If your licensed was renewed in the three months immediately prior to your arrival in Japan, make sure you have some proof that your license was originally issued before that last renewal date. Applying for your driving history from your local licensing authority or Department of Motor Vehicles works well for this. If you bring a separate form proving the date of issuance of your license, make sure to have someone translate it for you (you should be able to get away with an amateur translation of this form).
Other acceptable documents to prove that you were in your issuing country include (but are not limited to) academic transcripts and employment pay stubs.
If you are unable to prove that you were in the issuing country, you will be considered a new driver, and you will not be able to convert your license, but will have to apply for a new license.
Step 1: Get your license translated[]
The first thing you need to do is get an official translation of your current driver’s license. You can't just have anybody do it: only the JAF (Japan Automobile Federation) or your country's embassy can do it for you.
In order to get an official translation from JAF, there is an easy-to-follow guide on how to do this on the JAF website (English). Please refer to the "Application for Japanese Translation" section.
As an overview, you will need to
- print and fill out the license translation application (available in multiple languages on the JAF website)
- make a CLEAR copy of the front AND back of your license, preferably in color*
- pay ¥4000 (for each license to be translated)
- send your application, photocopy of your license, and fee by cash registered mail (現金書留 genkin kakitome) to the Aichi branch of JAF (the Kanazawa, Ishikawa branch does not offer license translation)
*Note: Make sure that your license has a section that indicates when your license was issued. The driving center needs to know when your license was issued.
License translations can take about 1-3 weeks. Once you have received your license translation, you can make your first appointment!
Step 2: Your First Appointment[]
So you've met the requirements and received your driver's license translation.
Now it's time to make your first appointment at the Ishikawa Prefecture Driver's License Center (運転免許センター unten menkyo sentā; hereafter "the Center") located in Kanazawa.
Things to be aware of:
- these appointments can only be scheduled at 1:00pm from Monday to Friday.
- the Center can only process two conversions a day, so make sure you start the process early.
- in June and July, the Center tends to get very busy.
- it can sometimes take multiple months to get an appointment.
- appointments must be made in advance - appointments will not be available for walk-ins.
This first appointment is a background and document check.
Scheduling[]
To make your first appointment, you will need to call the Center at 076-238-5901. Explain you want to convert your Driver's License into Japanese (in Japanese, it would be 外国免許の切り替え gaikoku menkyo no kirikae). If you don't speak Japanese, ask a fluent or confident Japanese speaker to call for you or hire an interpreter.
The Center will schedule an appointment for you.
IMPORTANT NOTE: When you call the center, you may want to confirm the documents you are required to bring. Different documents may be required depending on the origin country of your foreign driver's license.
What to Bring[]
- Passport
- including any previous, expired passports
- Residence Card
- Proof of Residence (住民票 jyuuminhyo)
- this is available at City Hall or your local city center
- Home country's driver's license
- including any previous, expired licenses (if possible)
- check your license's issued date; if your license doesn't have a date or if the date is less than 3 months before you came to Japan, you will need extra documents
- License translation(s) from JAF
- Your International Driver's Permit (only necessary if you drove yourself to the Center; it proves that you are driving legally)
- Someone who speaks Japanese if you would like support.
- Interpreters are available though services in the area
Please note you may be required to bring different or additional documents depending on the origin country of your foreign driver's license. Contact the Center to confirm your required documents list.
- You must be able to prove that you were in your home country over a certain period of time. If there are stamps that are out of order in your passport, it may be an idea to take your academic transcripts or employment pay stubs with you as supporting evidence.
Getting to the Center[]
- The Ishikawa Prefecture Driver's License Center is located in the outskirts of Kanazawa near Uchinada. 〒920-0209 石川県金沢市東蚊爪町2丁目1 石川県運転免許センター Parking is available for free at the Center. If you are unable to reach the Center by car, this may be the best possible route:
- Take your local transport to Kanazawa Station.
- From Kanazawa Station, take the Hokutetsu Rail to the last stop, Uchinada Station.
- From Uchinada Station, you can take a bus or a taxi directly to the Center.
- Be aware that the bus runs on a very limited schedule (timetable in Japanese).
- The last bus from the Center to Uchinada Station is at 4:15.
- If you miss the last bus, you will need to call a taxi or walk about 35 minutes to the closest Hokutetsu Rail station (Awagasaki Station).
What to Expect[]
At the Center, head upstairs to the second floor. Go to window 45; it will open promptly at 1:00pm. Bring all of your documents to the person at the window. They will give you a form with a list of statements for you to fill out and sign.
The Driving Experience Form[]
This is a form explaining some of the details of your driving experience. It will include things like*:
- Did you take a written exam to get your license? How many questions was it? How long did it take you? What kind of questions?
- Did you take a driving test? Was it on a course or the road? Whose car did you use? What kind of car was it? How long was the test?
- Did you take any other aptitude tests? (i.e., eye exam, hazard awareness, etc.)
- Do you know Japanese driving rules? Do you know what to do in a traffic accident? Do you know what the numbers 110 and 119 are for? Do you have any Japanese friends who can help you drive?
Return this paper to the window when finished. You will be asked to wait, usually for about an hour, while they prepare for your interview.
The Interview[]
During the interview, they will ask you about your documents, license, and driving history.
You will likely be asked about the stamps in your passport, particularly if the interviewer could not tell where the stamp was from. Make sure that you can recognize where the stamps are from, and know how long you were there.
Be prepared to answer questions about the process of receiving your driver's license, including things like*:
- where and when you learned how to drive
- if you took a class (like driver's education), how many hours your class was
- what kind of test(s) you took to receive your license
- whether you received a permit before your license
- how you updated your permit to a license
- how many times you've updated your license
- whether you had to test in between renewals
- whether you visited the center in person each time
*the above information about the driving experience form and interview was provided by the Akita JET Wiki
After the interview, they will take some more time to process your documents. Expect this whole process to take about 1.5 to 2 hours. When they are finished, they may either
- request that you provide further documentation,
- if this happens, you will have to repeat this first appointment
- or give you back your original documents, and make the second appointment.
Your second appointment is usually at least one week later, and appointment times are almost always non-negotiable. For those who come from countries that have to take the practical test, your next appointment will also be at 1 p.m. For those lucky ones who come from countries that don't have to take the practical test, your next appointment will most likely be at 2 p.m.
Step 3: Your Second Appointment[]
Are you Lucky or Unlucky?[]
"If you are from one of the whose driver's license system is deemed to be equivalent to that of Japan's, and if you are deemed to possess reasonable level of knowledge regarding driving skills and traffic regulations, you may be exempt from having to take the written test and the road test." - Ishikawa Prefecture Police, May 2022
Test-Exempt: The Lucky Ones
You are not required to take a written test and a road test if your license was issued by the authorities in the following countries and a region*:
Australia, Austria, Belgium, Canada, Czech Republic, Denmark, Finland, France, Germany, Greece, Holland, Hungary, Iceland, Ireland, Italy, Luxembourg, Monaco, New Zealand, Norway, Poland, Portugal, Slovenia, South Korea, Spain, Sweden, Switzerland, The United Kingdom, The United States of America (States of Hawaii, Maryland, Ohio, Virginia, and Washington only), and Taiwan
You are not required to take a road test if your license was issued by the authorities in the following country*.
The United States of America (Indiana State only)
*This list of countries and regions can be found here, provided by the Tokyo Metropolitan Police. Current as of April 2022.
Non-Exempt: The Unlucky Ones
If you are from a country or region other than the ones listed above, you will be required to take the written test and the road test.
The Lucky Ones: Test-Exempt[]
see whether or not you're a "Lucky One" above
The second appointment will include an aptitude test that checks your vision and color vision, as well as a possible hearing test.
You must make an appointment in advance - appointments on the day of the test will not be accepted.
What to Bring[]
- All of the original documents from appointment 1
- A 3cm x 2.4cm photo of yourself taken within the last 6 months
- there is a photo booth available on the first floor of the Center
- Glasses, if applicable
- Application and licensing fees (cash, about ¥5000)
For an official, broad overview of appointment 2 procedures, including what to bring and an explanation of fees, please check the Ishikawa Prefecture Driver's License Center's website (Japanese). Generally, most first-time license holders in Japan will fall under the 一般試験を受験される方 (ippan shiken o jukensareru kata), or general exam, category.
What to Expect[]
At the Center, go to window 45 on the second floor. Your documents will be processed, and you will fill out some forms with your name and address, and sign a form about your health.
After that, you will go to the cashier window and pay an initial fee. Then return to window 45, and you will be asked to wait until they call you for the aptitude tests (vision and color vision, possibly hearing). More information on the aptitude tests can be found below in the Tests section.
If you require glasses to drive, make sure to bring them on the day of your second appointment.
Once you've passed the test(s), the difficult part is over.
Now, they will send you down to the first floor and you can relax until about 3:15pm. Then, you will:
- make two 4-digit PIN numbers at an ATM-like machine
- chose numbers that will be easy to remember - you will need these numbers if you ever need to replace your license
- you can use the same 4-digit number twice
- have your photo taken for the license
- pay a licensing fee at another window
- wait a final 10 minutes for your license to be printed.
People usually receive their licenses around 3:30pm.
Celebrate! You've done it! You can now legally drive in Japan until it's time to renew your license.
The Unlucky Ones: Non-Exempt[]
see whether or not you're an "Unlucky One" above
The second appointment will include an aptitude tests that checks your vision and color vision (and possibly hearing), a written test, and a driving test.
Please be aware that if you bring an interpreter with you, they will not be able to assist you during any part of the practical driving test.
You must make an appointment in advance - appointments on the day of the test will not be accepted.
What to Bring[]
- All of the original documents from appointment 1
- A 3cm x 2.4cm photo of yourself taken within the last 6 months
- there is a photo booth available on the first floor of the Center
- Glasses, if applicable
- A pencil and eraser
- Closed-toed shoes
- Application, testing, and licensing fees (cash, about ¥6000)
For an official, broad overview of appointment 2 procedures, including what to bring and an explanation of fees, please check the Ishikawa Prefecture Driver's License Center's website (Japanese). Generally, most first-time license holders in Japan will fall under the 一般試験を受験される方 (ippan shiken o jukensareru kata), or general exam, category.
What to Expect[]
At the Center, go to window 45 on the second floor. Your documents will be processed, and you will fill out some forms with your name and address, and sign a form about your health.
After that, you will go to the cashier window and pay a testing fee. Then return to window 45, and you will be asked to wait until they call you for the aptitude tests (vision and color vision, possibly hearing) and the written test. If you would like to take the written test in English, tell them now. Other languages, including but not limited to Chinese, Korean, Spanish, and Portuguese, are available as well; please check with the Center to see if your preferred language is offered.
After the written test, the last step is the practical driving test.
For more information on all of the tests, see the Tests section below.
If you do not pass the written and/or driving test, you will be required to retake the failed test(s) and pay the testing fee(s) again.
If you pass the tests, celebrate! The difficult part is over.
Now, they will send you down to the first floor and you can relax until about 3:15pm. Then, you will:
- make two 4-digit PIN numbers at an ATM-like machine
- chose numbers that will be easy to remember - you will need these numbers if you ever need to replace your license
- you can use the same 4-digit number twice
- have your photo taken for the license
- pay a licensing fee at another window
- wait a final 10 minutes for your license to be printed.
People usually receive their licenses around 3:30pm.
Celebrate! You've done it! You can now legally drive in Japan until it's time to renew your license.
The Exams[]
What to Bring[]
On the day of your exam, DO NOT FORGET ANY OF YOUR DOCUMENTS AND IDs. They already have copies of everything, but you still need to bring the originals again. You can't take the exam without your paperwork present.
REMEMBER:
- Passport
- including any previous, expired passports
- Residence Card
- Proof of Residence (住民票 jyuuminhyo)
- this is available at City Hall or your local city center
- Home country's driver's license
- including any previous, expired licenses (if possible)
- check your license's issued date; if your license doesn't have a date or if the date is less than 3 months before you came to Japan, you will need extra documents
- License translation(s) from JAF
- Your International Driver's Permit (only necessary if you drove yourself to the Center; it proves that you are driving legally)
- Someone who speaks Japanese if you would like support.
- Interpreters are available though services in the area
- Please be aware that if you bring an interpreter with you, they will not be able to assist you during any part of the practical driving test.
- A 3cm x 2.4cm photo of yourself taken within the last 6 months
- there is a photo booth available on the first floor of the Center
- Glasses, if applicable
- A pencil and eraser (if taking the written exam; also helpful for the practical exam)
- Closed-toed shoes (if taking the practical exam)
- Testing and licensing fees (cash, about ¥6000)
The Eye Exam[]
Everyone has to take the eye exam, regardless of whether or not you are taking the practical and written exams.
If you require glasses to drive, make sure to bring them on the day of your second appointment.
There are two parts to the eye exam:
- general vision acuity - Japanese eye exams require you to say which direction the open side of the “C” is facing (ue up, shita down, hidari left, or migi right)
- ability to see color - the exam will require you to say the colors of the traffic light
- remember that in Japan, the "green" light is actually "blue" (seriously, don't forget)
The Written Exam[]
The test is available in English so make sure to request it if necessary. Other languages are available as well; please check with the Center to see if your preferred language is offered.
The test is comprised of a random 10 out of 50 true or false questions accompanied by diagrams. You will have 10 minutes to take the exam, and there is a 70% pass line. You will need to mark your answers with either 〇 (true) or ✕ (false); be careful because any other marks (such as a checkmark ✓, etc.) will not be counted.
There will likely be a selection of the questions below so it is advisable to review the questions and answers in advance and learn Japanese road signs. Sometimes the questions are strangely worded but the answer is usually the most obvious one, so try not to over-think it. It is not common for anyone to fail this exam.
| Example Questions | Answers |
|---|---|
| If you're on a road with two lanes heading in the same direction, you must drive in the left lane unless you want to pass someone. | 〇 |
| You must wear your seat belt and make sure your passengers are too. | 〇 |
| There are no lights or sounds at the train tracks, and the bars aren't lowering. You don't have to stop before the tracks. | ✕ |
| You're turning right at an intersection, and another car is approaching from the other direction. You must wait for them even if you got there first. | 〇 |
| When making a right turn, you have to stay in the center before moving to the right side of the lane. (An illustration of the arrows indicating where your car should be is shown here.) | 〇 |
| You cannot pass another car within 30 meters of a crosswalk or intersection. | 〇 |
| When children are present, you have to reduce speed or stop so they can cross safely. | 〇 |
| Japanese cars are well manufactured and don't need maintenance. | ✕ |
| There are yellow blinking lights showing on the traffic signal. You don't have to pay attention to other motorists. | ✕ |
| There is a sign that means "no right turn" along with a red arrow underneath. You can turn into the store on the right facing the street. | ✕ |
| There is a "no entrance" sign on a street. You can drive your car or moped on that street. | ✕ |
| There is a "pedestrians only" sign on a street. You can drive your car on that street. | ✕ |
| There is a "no parking" sign (the blue and red one with the red "X"). You can park here. | ✕ |
| There is a "stop" sign on a street. This means you don't have to stop before turning right or left. | ✕ |
| There is no need to call the police when there's an accident even if the other person seems responsible. | ✕ |
You can take several practice written exams on this page.
*the above information about the written test was provided by the Akita JET Wiki
The Practical Exam[]
About the Exam[]
Please be aware that if you bring an interpreter with you, they will not be able to assist you during any part of the practical driving test.
The test is conducted on a predetermined course set up at the Center. The test course changes everyday, and the day's course will be displayed on a screen on the second floor of the Center; the screen can be found in the area that overlooks the driving course at the back of the building. There are different screens with different courses displayed - make sure you find the correct course.
Paper will be provided for you to copy the course onto (bring a pencil). You can walk the course from 12:00-1:00pm if you want to practice. This is highly recommended as you are expected to memorize the course, though you can ask for directions during the test if you need them. You cannot look at the course paper while you are driving.
At 1:00pm, the tests will begin. Wait for your name to be called, then proceed to the testing area.
Your evaluator will most likely limit their speech to an initial greeting, a starting notice, and to tell you where to park at the end. Do not expect them to speak or understand English. If you have an interpreter with you, they will not be allowed to accompany you on the test.
As for what to do during the test itself, please review the "How to Pass" guide.
The most important thing to keep in mind is that the practical driving test is not so much a test of your driving ability, but more like a ceremony to see if you can perform a certain set of actions correctly.
And remember to wear closed-toed shoes.
Practice[]
It is highly recommended that you go to a driving school and take a driving lesson for at least 1 hour (2 hours ideally) before you take the test. These classes can show you exactly how to pass the test, and they'll give you an idea of what the test will feel like.
While there are local driving schools in your area, there is also a driving school conveniently located right next to the Center. It's called the Anzen Unten Center (安全運転センター; appointment required, phone: 076-237-2735). If you take a training class at this Center, you can drive on the same roads that the test will be on (though the course may be different).
Many JETs have taken 1 or 2 hours of practice right before taking their test and found it incredibly helpful for passing.
Most places will allow you to bring an interpreter in the car with you while you're taking a driving lesson, but please remember that you will be alone with the test evaluator at the time of your practical exam. No interpreters will be allowed in the car during the practical exam.
How to Pass[]
There is an old (2005) but still useful guide on passing the practical driver's test (see Chapter 5, p27-32) compiled by a JET in Hiroshima.
The information below applies to AUTOMATIC license tests. Some of the information can be applied to MANUAL/SHIFT.
Before getting in the car
1. Check around the car in the front and the passenger side and the back, around and under the car to make sure that a small creature is not located anywhere near the car. BE OBVIOUS! Check to the left and right for traffic BEFORE heading to the door.
2. Walk to the driver's side, but before opening the door check OBVIOUSLY left and right.
3. Open the door.
How to start up the car
1. After you get in the car, move the chair up two notches so that you are basically uncomfortable, especially if you are a very tall person.
2. Lock the car door.
3. Put on your seatbelt.
4. Check mirrors and adjust the rearview mirror. The other two mirrors are on the hood of the car, and you won't be adjusting them. Look at the bottom half of
the two mirrors. The top two are for the inspector.
5. Put foot on brake.
6. Check all the mirrors again, and the bike area which is located on the left side middle back.
7. Start engine.
8. Change Park to drive, but look at the dash not the panel on the floor.
9. Take off the emergency brake.
10. Check again all mirrors and the bike area.
11. Put the blinker on and go.
12. Check again all mirrors and the bike area.
Making a left turn
1. Keep left within 1 meter of the curb. Your car needs to be within one meter of the curb, but no more. Do not go over the white line.
2. Slow down.
3. Turn left blinker on about 30 meters before the turn.
4. Keep left. Angle wheels to the left.
5. Look to the right.
6. Look in the rear view mirror.
7. Look at the left mirror.
8. Look at the bike area.
9. Look to the right and go.
10. Keep to the left.
Making a lane change - even if there isn't a new lane.
(A lane change here is if you are on the left and you need to make a right turn, then you must move over to the right hand side.) The right hand turn is a separate action.)
1. Remember you are on the left to start.
2. Put on your right blinker.
3. Staying in the same lane, count 3 seconds, out loud if you have to, because you need to be OBVIOUS.
4. Do a safety check. Right mirror, right check back, rear view mirror, left mirror, review mirror. No bike check necessary because bikes/mopeds can't make right hand turns like cars/motorcycles.
5. Move to within 50cm, not more and not on the white line, and turn off your blinker.
Now, if you like, you are READY to make a RIGHT turn, but are not going to make another immediate RIGHT
Making a right turn not followed by another right TURN
6. Turn your blinker on again to make the right turn. Remember 30 meters before, so if you just came out of a lane change, then do put the blinker on right after you turned it off.
7. Stay straight in the lane, close to the right hand side line.
8. Check straight ahead, left, and then right. Move slowly.
9. Move the car into the far left lane, and KEEP LEFT.
Making a right turn followed by another right TURN
If you are going to make an Immediate RIGHT turn, turn into the right turn lane. Turn off your blinker, or it hasn't turned off, and then turn it on again to make the next right turn, following, of course, the steps on how to make a right turn.
Making a U-Turn
1. Beginning in the far left-hand lane, make a lane change to the right-hand side of the left lane. (Do NOT move into the right-hand lane.
2. Performing mirror checks like those in a right turn, you will turn from YOUR far left lane into the opposing direction's far left.
Passing a stopped or parked car
1. Put blinker on 30 meters moving the car to the right.
2. Staying in the same lane, count 3 seconds, out loud if you have to, because you need to be OBVIOUS.
3. Do a safety check. Right mirror, left mirror, rear view mirror.
4. You can move into the next lane, straddle both lanes, but keep a distance of 9 feet between you and the parked/stopped car. The 9 feet is about the same width of the test. car.
5. Immediately, put on the left turn signal.
6. Staying in the same lane, count 3 seconds, out loud if you have to, because you need to be OBVIOUS.
7. Do a safety check. Right, rear, left mirrors, and BIKE area.
8. Then, move back into the left lane.
Blind intersection
1. Stop at the stop sign or just stop if there isn't a stop sign.
2. Check left and right mirrors.
3. Move forward slowly to an invisible line in front of the white line. Check left and right.
4. For a left turn, turn car in an angle to the left. For the right, stay straight.
5. Follow general guidelines for the different turns.
6. Make sure you go very slowly.
Blind curve
1. Slow down before entering the curve.
2. Provide space in the left area in case there is a bicycle there.
3. Then, resume lane and keep to the left.
S-curve, Crank, and Ramp
-S-curve- drive very very very very slowly around the curve. Keep to the far left, then far right, and so on. When you drive into the curve, hug the left or right side of the curve to make sure that you do not go into the ditch.
-If you do go into a ditch, STOP. Then, reverse (LOOK in MIRRORS). If you go forward in the ditch, you will fail.
-When exiting the Crank and S-curve, be careful not to touch the curb. Passing over the edge as you turn onto the main road is an IMMEDIATE FAIL.
-If you are about to hit one of the poles, use REVERSE. It is better to REVERSE than hit a pole. (I reversed twice, and still passed the FIRST time.) When reversing, check all mirrors and back up looking over your LEFT shoulder. You will fail if you hit a pole or go into a ditch.
-There is a ramp in the test (which you may or may not have to go on). When you are on the main road, and before the two paths of the streets meet, LOOK to the left and bike area to make sure that the driver on the ramp doesn't come crashing down to kill you because they forgot to YIELD. As you approach the top of the ramp, slow to a stop as soon as you can see over the top. Honk once, then proceed slowly over the top.
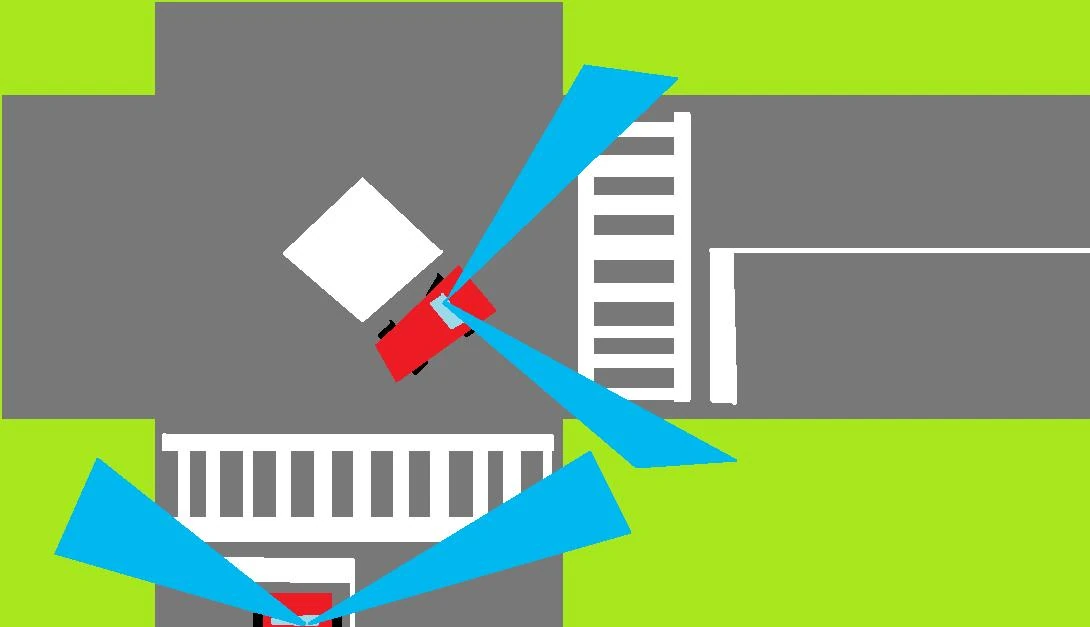
Intersection Notes
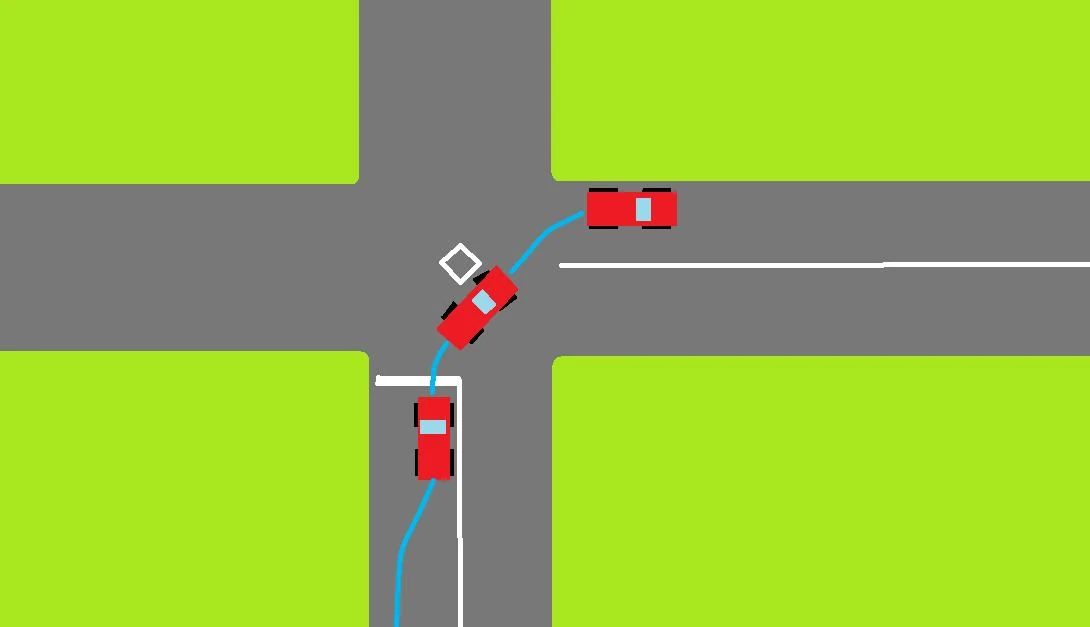
Passing by a diamond in the intersection.
-When turning through a four way intersection, DO NOT pass over the center diamonds. You should come close to them, but not over them
-When passing through an intersection with crosswalks, look to the left and right and make an audible "check" noise. If you are in the middle of the intersection slow down a bit to do so for the farthest crosswalk, but do not stop
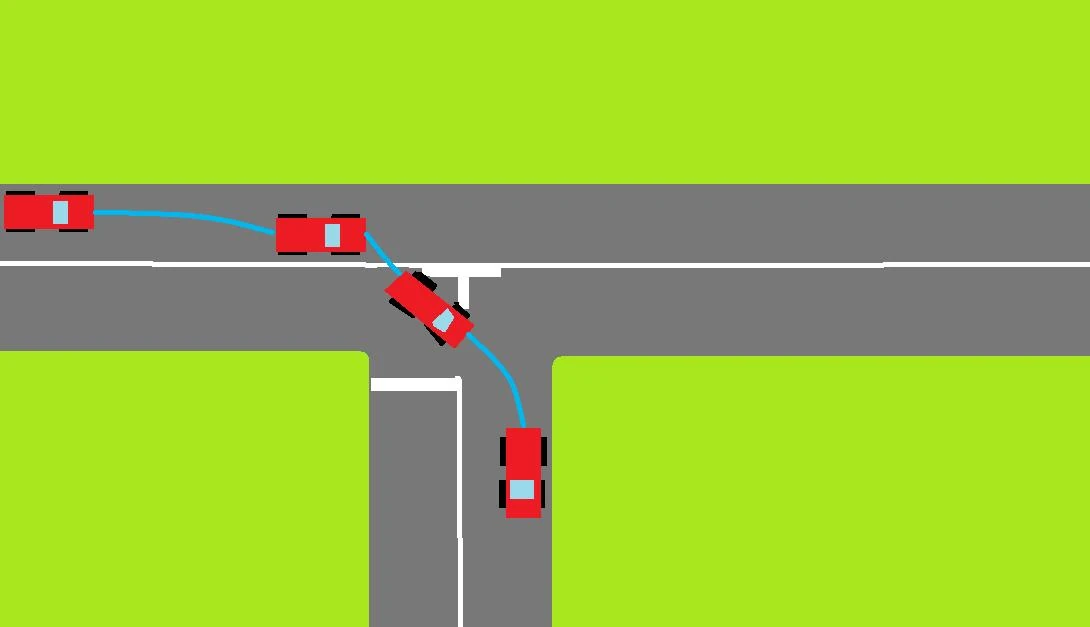
A T-intersection
-When turning at a T-intersection, two of your tires should pass over two points of the T. (Barely touching, if you pass over the center you will lose points.)
How to get out of the car
1. Park the car.
2. Push on the foot brake.
3. Set the emergency brake.
4. Put in Park.
5. Turn off the engine.
6. Take off seatbelt.
7. Check mirrors again.
8. Look to the right and the right back before opening
the car door.
9. Get out, and pray that you passed.
NOTES
1) Read and practice the preceding information until you are doing it naturally.
2) This is Japan. The driving test is not so much about skills, but about appearance and memorization of procedures and the course.
3) Dress nicely. Wearing business dress might help.
4) If you can understand and speak some Japanese, be polite and bow a lot. Use onegaishimasu a lot.
5) Memorize the course well. If you did not memorize the course well and you realize that you drove down the wrong road, then pull over safely and stop. ASK the inspector what you should do. You will not lose points if you lose your way.
6) Be prepared to have your picture taken after passing the test.
7) There are white lines on the practice course, spaced about 10 meters apart. This visual will help you to remember what 30 meters looks like.
8) There are maps of the course nearby. Take one and draw the course on it. Practice in your mind how you will do the course. (I wrote out what I was going to do.) Look at the course outside.
9)The inspector will sit in the car with you, but he won't say much to you. You are supposed to know the course. Sometimes you are allowed to walk the course before you drive it. This will be between the hours of 12 and 1 (lunch time). There are occasionally other courses being shown on the monitors, make certain you look at the screen and course for foreigners.
10) He/She will tell you when to go to 50 kph.
11) You will be allowed to do one small loop on the test course as a practice. It is a very small loop and not enough to get used to the car. All the cars are the same.
12) BE PARANOID! DO EVERYTHING OBVIOUSLY! STOP OBVIOUSLY, No California rolls or stops.
13) Turn your head to make your mirror and bike area checks. Make it VERY OBVIOUS that you are Turning your head. Turn your head unnaturally so far to look, and look again. If you have to, say, Check, or Yoshi when you check each mirror.
14) There will be a yellow flashing light. Slow down before it, and look both ways before crossing over it.
15) A little before curves, slow down, and PUMP the brakes at least two times, then enter the curve at a safe speed. Do not speed up in a curve. You should travel/coast at 25-30 kph in the curve. Do not touch the brake or accelerator
Vocabulary
| Japanese | English |
|---|---|
| kosaten or jyujiro | intersection |
| mitoshi ga warui kosaten | blind intersection |
| kotai | reverse |
| shupatsu | start (begin) |
| migi | right |
| hidari | left |
| masugu | straight |
| cado | curve/corner |
| tomare | stop |
| kakunin | check |
| shinro henko | lane change |
| shingo | stop light |
| hayaku | speed up |
| yukkuri | slow down/more slowly |
| owari | finished |
| ushiro o miru koto ga dekimasen | I can't see the back/behind. |
| mira o kaeru koto ga dekismasuka | Can I change the mirror? |
Measurement equivalents
30 meters 98 feet
2.7 meters 9 feet or width of car to pass a stopped car
50 centimeters 1.6 feet for space between you and the right hand side line to make a right turn
1 meter 3.2 feet to leave a space between you and the left side (Keep left rule)
**Disclaimer: This is by no means comprehensive and if you fail, sorry. This information has been written and shared to help others in the same situation.
Tips from past JETs[]
- Many people have had a bad experience with the testing instructor named Imai (an old man with glasses). He's been known to yell and grab the steering wheel during the test, among other things. You can avoid him by requesting to have a female instructor, though this option is usually only available to female test-takers. (Ishikawa PA 2022)
- On passing the first time: I PASSED the FIRST time! What I did: 1) I took the Japanese driving school course for two hours ¥9200 (¥ 4600 yen per hour). I brought a Japanese friend to help me understand and to write down procedures. 2) I practiced what I learnt in the driving school for three days (I drove my friends crazy practicing as a SAFETY Driver). 4) I traced the map given to me on the test day, and I wrote out how I was going to do each turn, when and how. 5) I asked for more time until I was ready to take the driving test. (Anonymous, Ishikawa JETs Forum, 2004) I passed the first time. What I did: 1) Took two hours of driving classes on the same day as my practical test. 2) Wrote down and went over everything I had learned (I can't multitask and I take a really long time to memorize things). 3) Wrote down the procedure for how to do the following things: turn left, turn right, change lanes, get into the car, start the car. It took many repetitions of writing them down in order for me to remember. Each of these things has an order and a precise way to do them, and this is arguably the most important part of the test. A girl before me failed for not looking over her left shoulder on a left turn 1 out of 12 times. 4) Memorized the test course. Seriously, so important. You have so many more things to do than worry about your route. Trace it, visualize it, go out and walk it if you can. 5) Repeated instructions to myself out loud during the test (in English). Several times I actually saw him waiting for me to speak to myself before he wrote down a score (for example, audibly counting to three after signaling before a lane change). Make it seem as if you need to remind yourself of everything you have memorized (which you do), don't try to look cool. 6) Dressed nice, smiled and was very polite. I also asked questions and said "yoroshiku onegaishimasu". (Mel, 2016) Can confirm, if you do the things listed above, it'll help you pass in one test! For me, taking a driving class on the course that the test would be on was especially helpful and I can't recommend it enough. Those classes are available at the driving school located right next to the Ishikawa Prefecture Driving Center. (Sami, 2022 - passed the test in 2019)
- Say everything out loud. Check. 1,2,3, etc. (Leah, 2010)
- Take the classes!!! (Adam, 2010)
- Regarding the manual test:
First: You are driving a manual car that you have probably never driven before. There were two types that I drove: The standard Toyota taxi and another much older Nissan mid-size sedan. The Nissan had a very light clutch (compared to my beast) and relatively short gears. If I remember correctly, the Toyota taxi has a slightly heavier clutch and MUCH taller gears. I don't think I got out of third gear on the Toyota at all, but needed fourth on the Nissan. I also remember lugging the engine a bit on the Toyota since the gears were so tall.
Second: I never stalled the car. It's better to rev it a little higher than normal than to stall it. I can't imagine that stalling it would help you pass.
Third: I read on the wonderful walkthrough posted earlier in this thread that you are adjust your seat close to the wheel, even if it's uncomfortable. I disagree with this, at least for the manual test. You simply can't comfortably shift a car if you're smashed against the dash. Make it comfortable for yourself.
Fourth: The car will be parked in first gear when you get in the car. When you leave the car, you are to leave it in first gear as well.
Fifth: For me, the most difficult thing to remember was to always keep both hands on the wheel. When driving naturally, you find yourself keeping one had on the wheel and another on the shift lever. If you do not do a 'hand over hand' motion when making turns and instead do something like using the palm of your right hand to spin the wheel while using your left to manipulate the gears, you will fail. You must take your left hand off the wheel to shift gears and then put it right back on the steering wheel. Every time. Get over that habit before you take the test. It is extremely hard to change years of habit in a single sitting.
Sixth: When you stop, do not put the car into neutral. Come to complete stop and shift gears back to first. Since you won't be going much past second anyway during the main part of the course, I don't think is much of an inconvenience.
Seventh: When making one of those wide sweeping turns after speeding up to 50 km/h, of course pump the brakes twice to bring you down to a crawl and go through the curve with the clutch to the floor and let the car truly coast through the turn. I went very slowly through these curves (agonizingly slow, I thought) and passed. --Nalhagen (Ishikawa JET forum)
-Say it along with me now it is Driving Ceremony.
Making tea in a pot is making tea. An elaborate and complicated demonstration on the art of making tea, making sure to follow the inane rules is tea ceremony.
The Japanese driving test is car ceremony - it has nothing to do with your competence to drive. Anyone can make tea, anyone can drive a car, but it takes lots of work and preparation to perform the ceremonies.
If you look at it as taking a driving test, then you'll just be upset. Look at it as car ceremony, take the class and you'll have the proper mindset and understand the basic level of practice necessary.
Useful links and sources[]
- JET General Information Handbook (p125)
- Ishikawa Prefecture Living Guide (p43-45)
- Japan Automobile Federation
- Ishikawa Prefecture Driver's License Center - Ishikawa-specific official information on how to convert your license
- An old (2005) but still useful guide on passing the practical driver's test (see Chapter 5, p27-32) compiled by a JET in Hiroshimahttp://www.supermelf.com/japan/ajetdrivingbook/index.htm
- A guide from Akita Prefecture; some information is Akita-specific, but a lot of the information applies to the process in Ishikawa as well
- This guide also includes 2 YouTube videos that may be useful
- This is a Japanese guide to the test, but it provides a sample test course map which may be useful. It also provides diagrams and extra pointers on signalling.
Related Ishikawa Wiki Pages: